
If you're looking for a Texas chili recipe with no beans, this is the one I make. It's thick, beefy, and full of that deep chile flavor you want in a proper bowl of red. I use ground beef to keep it practical, Gebhardt chili powder for that classic Texas flavor, and one very untraditional cup of Dr Pepper because it balances the heat in the best way.
A Note From My Kitchen
I grew up eating just about everything. I wasn't a picky kid at all, but there were two things I could not get behind: liver and beans.
So when my mom made chili without beans, I was very much on board. It never felt like a compromise. It was just the way she made chili, and I loved it.
I'll eat beans now. They still aren't my favorite thing in the world, but I've made peace with them.
I just don't put them in my chili.
Partly because I've always liked chili better without them, and partly because I live in Texas now, where adding beans to chili is the kind of thing people have opinions about.
Turns out my mom had it right all along.
~ Holly ❤️
This is part of my Forks in the Road: Recipes From Across America series, where week by week, I'll explore the foods and flavors of America and recreate the most popular recipes from all 50 states.
What Makes Texas Chili Different?
It's all about regional heritage and specific cooking traditions.
First and most famously, true Texas chili has NO beans. This isn't just preference; it's practically law in Texas. The traditional "Bowl of Red" was created by San Antonio's Chili Queens in the 1800s, and they made it with meat, chili peppers, and spices - nothing else. Adding beans was a later adaptation in other regions, often as a way to stretch the dish during harder times.
Traditional Texas chili was often made with chunks of beef chuck simmered low and slow until tender. This version uses ground beef, which makes it more practical for home cooking but still gives you that rich, beefy flavor. The key is to brown the meat well before adding the peppers, spices, and liquid. Don't just cook it until it turns gray - let it develop some color first. That's where the flavor starts.
Another key element is the spice blend-it relies heavily on dried chiles rather than fresh ones. Real Texas chili gets its rich, complex flavor from a combination of different ground red chiles, heavy on cumin (an influence from Mexican cuisine). The sauce should be thick and rich, never soupy.
Interestingly, what we now consider authentic Texas chili was officially recognized as the State Dish of Texas in 1977, cementing its cultural importance. The tradition of letting it rest overnight wasn't just for flavor - it was practical for working ranchers who needed hearty, reheatable meals.
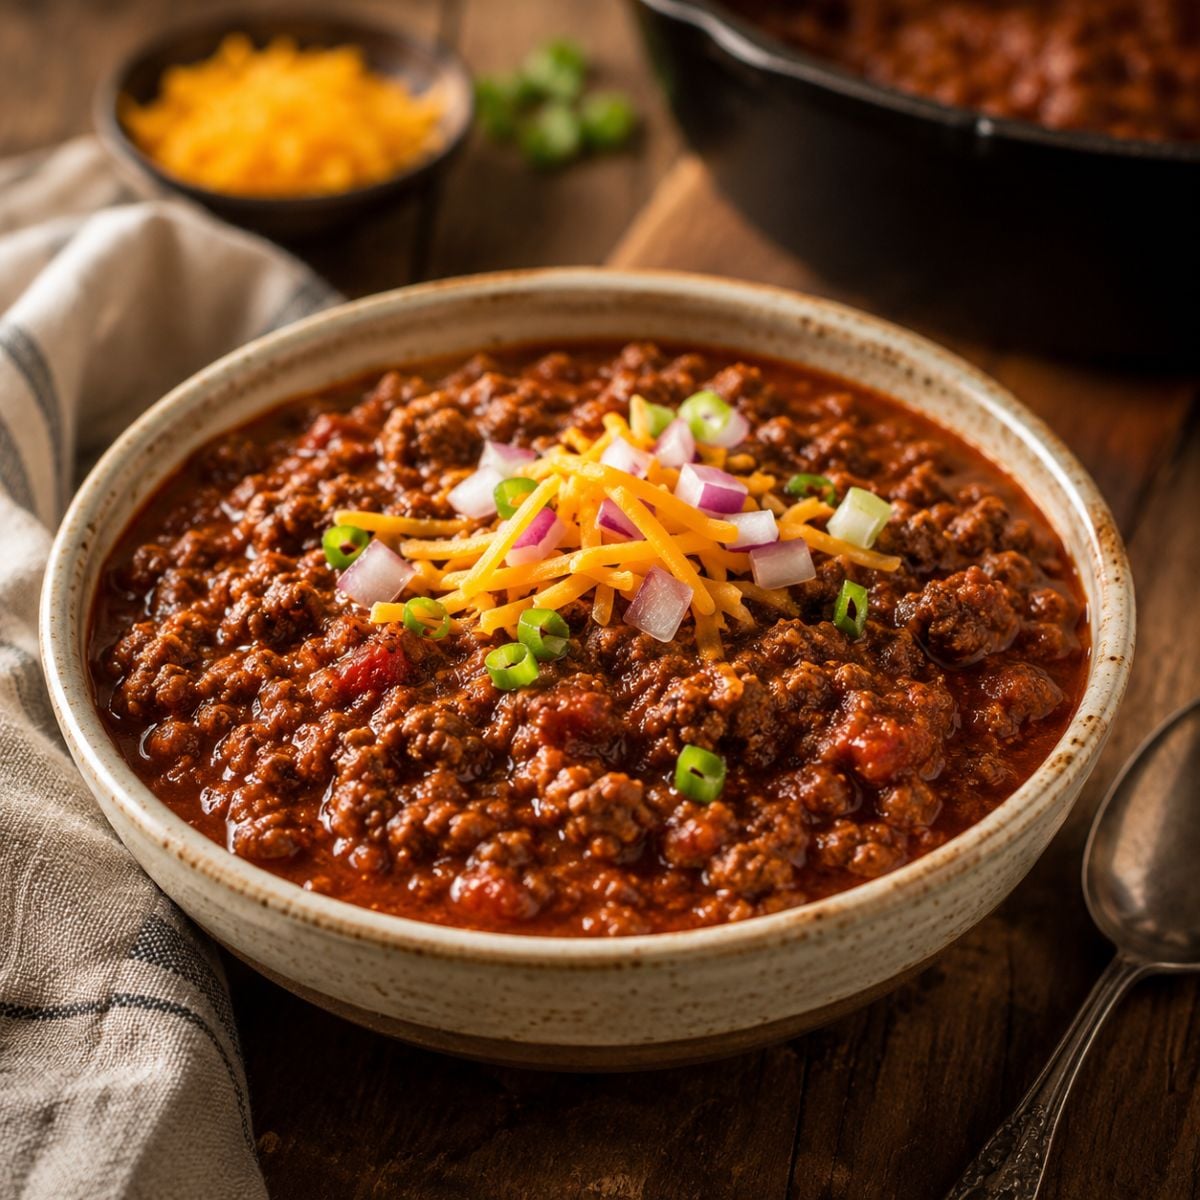
And while modern additions like topping with cheddar cheese or serving over Fritos (Frito Pie is a cherished Texas tradition) aren't strictly traditional, they've become part of the Lone Star state's evolving chili culture.
Let's Gather Up the Ingredients

Organizing all of your ingredients ahead of time not only streamlines the cooking process but also ensures you have everything required to complete the dish successfully. You can find the exact ingredient amounts in the recipe card below.
- Ground beef, chili grind preferred. You can use lean ground beef if you choose, but 80/20 is my preference. You can always skim the extra fat off the top if it bothers you, but fat equals flavor, so I stir it back in.
- Kosher salt
- Onion- diced
- Fresh garlic- minced
- Poblano pepper- diced
- Anaheim peppers- diced
- Tomato paste- adds richness.
- San Marzano tomatoes- crushed by hand
- Paprika- brings a sweet, earthy depth and that iconic deep red color without adding any heat.
- Ground cumin- adds a rich, warm aroma and that unmistakable Tex-Mex flavor that's key to a great chili.
- Black pepper
- Cayenne pepper (optional)
- Gebhardt Chile Powder- forms the base of authentic chili flavor with a rich blend of ground chiles and spices.
- Mexican oregano- Mexican oregano has a bolder, earthier flavor with citrus and licorice notes, unlike the milder, minty Mediterranean variety. It's perfect for Tex-Mex and chili, adding depth and complexity. If you can't find it, regular oregano will work just fine.
- Masa- An optional thickener that enhances the chili's texture while adding a hint of corn flavor.
- Dr. Pepper- yes, I know this is not traditional, but Dr. Pepper was created in Texas after all, and it adds a delightful sweetness that balances the heat from the chile peppers.
- Beef stock
- Tomato puree
Now Let's Get Cooking
Dice the onions, peppers, and garlic and set aside.


To begin, heat a large heavy-bottomed pot (or Dutch oven) over medium-high heat. Brown the ground beef well with 1 teaspoon of salt. Then, add the onion, peppers, and garlic to the seared meat and cook until the veggies have softened, about 6 minutes.


Next, add 3 tablespoons of tomato paste and incorporate it into the mixture. Cook for a few minutes until it starts to caramelize.


Crush the San Marzano tomatoes with your hands as you add them to the pot.


Add all of the dry ingredients (except masa) and the cup of Dr. Pepper. Continue cooking until the Dr. Pepper is mostly gone.


Now add the beef broth and simmer over low heat for 30 minutes.
Add the masa or cornmeal and cook until it has thickened - taste for salt.
Simmer as long as desired. Serve immediately or chill overnight to develop the flavors.
Storage and Reheating Guide
How to Freeze Chili
- Cool completely before freezing
- Portion into airtight containers or heavy-duty freezer bags
- Leave a slight headspace for expansion
- Label with the date (keeps up to 6 months)
- For best results, freeze without toppings
I love to freeze soups and stews in these Souper Cubes because it makes life on the road so much easier. The portions are already measured, the trays stack neatly in the freezer, and nothing gets lost or forgotten. On travel days or nights when I really don't feel like cooking, I can grab a portion, heat it up, and call it dinner without much thought.
How to Reheat Frozen Chili
- Thaw overnight in the refrigerator
- Stovetop Method: Heat in a pot over medium heat, stirring occasionally
- Microwave Method: Heat in a microwave-safe container, stirring every 2 minutes
- Add a splash of beef stock if needed to reach the desired consistency
Ground Beef vs Chuck Roast
Ground beef is the easier option here, and chili grind is even better if you can find it because the texture is a little coarser.
Chuck roast will give you a more traditional, stew-like chili, but it needs a longer cook time. If you go that route, cut it into small bite-sized pieces, brown it well, and simmer the chili for 2 to 3 hours, or until the beef is tender.
Frequently Asked Questions
Q: Why no beans in Texas chili?
A: Traditional Texas red chili is bean-free. The focus is on the meat and the rich, spiced sauce. Adding beans is considered a modern adaptation from other regions.
Q: Does it really get better the next day?
A: Yes! Letting the chili rest overnight allows the flavors to meld and deepen. Many Texans deliberately make their chili a day ahead.
Q: Can I make this spicier?
A: Absolutely! Adjust the cayenne pepper to taste, or add fresh jalapeños during cooking. You can also experiment with different types of dried chilies.
Q: What's the secret to great texture?
A: Two things: properly searing the meat to develop a deep brown crust, and allowing enough time for the chili to simmer and reduce.
Q: How do I serve Texas-style chili? Traditional servings include:
- Straight up in a bowl
- As Frito pie (over Fritos corn chips and slathered in Queso)
- Topped with cheddar cheese, a dollop of sour cream, and green onions
- Over cornbread
- With tortilla chips
Remember, authentic Texas chili is all about building layers of flavor through proper technique and patience. Don't rush the process - good chili takes time, but it's worth every minute.
If you are enjoying my Forks in the Road series, check out more of the classic recipes I have adapted from around the United States.


DID YOU MAKE THIS RECIPE?
I'd love to know how it turned out! Leave a review or snap a quick photo and tag me on Facebook.
Every time you share one of my recipes, it helps me grow this blog-and I'm so grateful for your support.
As always, I will be back next week with more delicious recipes from my RV kitchen to yours!
This post may contain affiliate links. Read my full disclosure policy.
Learn how to get Amazon deliveries straight to your RV.

Texas Chili Recipe No Beans | Thick & Beefy Bowl of Red
Ingredients
- 2 pounds ground beef chili grind preferred
- 1 teaspoon Kosher salt
- 1 onion- diced
- 3 large cloves of garlic- minced
- 1 poblano pepper- diced
- 2 Anaheim peppers- diced
- 3 tablespoons tomato paste
- 1 28-ounce whole San Marzano tomatoes hand-crushed
- 1 ½ teaspoon paprika
- 1 ½ teaspoon ground cumin
- 1 ½ teaspoons salt
- Black pepper
- ½ teaspoon cayenne pepper optional
- ½ cup Gebhardt Chili Powder
- 2 teaspoons Mexican oregano
- 2 tablespoons masa or cornmeal
- 1 cup Dr. Pepper
- 2 cups beef stock
- 1 cup tomato puree
Instructions
- Dice the onions, peppers, and garlic and set aside.
- Heat a large heavy-bottomed pot over medium-high heat. Add the ground beef and 1 teaspoon of salt. Brown the meat well. Add the onion, peppers, and garlic to the seared meat and cook until the veggies have softened about 6 minutes.
- Add 3 tablespoons of tomato paste and incorporate into the mixture. Cook for a few minutes until it starts to caramelize. Add the hand-crushed San Marzano tomatoes and stir until well combined.
- Add 1 ½ teaspoons paprika, 1 ½ teaspoons ground cumin, 1 ½ teaspoons salt, ½ cup chili powder, 2 teaspoons oregano, black pepper, ½ teaspoon cayenne pepper (if using), and the cup of Dr. Pepper. Cook until the Dr. Pepper is mostly gone.
- Add the beef broth and simmer over low heat for 30 minutes.
- Add the masa or cornmeal and cook until it has thickened. Add tomato puree and taste for salt.
- Simmer as long as desired


Brenda says
Not completely "authentic" but SO good! I made this for a work party yesterday and got so many compliments! I will definitely be making it again in the near future.